
This gallery contains 2 photos.
While on a Christmas holiday with DS and his family I did Eco dyed using eucalyptus, fig leaves and sea weed. The result was very pleasing.
This gallery contains 2 photos.
While on a Christmas holiday with DS and his family I did Eco dyed using eucalyptus, fig leaves and sea weed. The result was very pleasing.
I was reluctant to try Arashi Shibori for ages fearing the steaming part of the process! Deanna said in her comments that steaming only creates the pleats. If I don’t care about the pleats I can dye without steaming. So here is my first Arashi Shibori. It was harder than it looked when Glennis did it. I didn’t have any gadgets to work with; only this drum- like tube. After a lot of winding I did not feel that I did all that well. Even so, I decided to put it in the dye bath as it was.

I had dyed the silk yellow the previous day. After the winding I dipped it in turquoise. I left it overnight for the color to react. When I unwrapped it after 24 hours I wasn’t totally happy with it. I feel that the winding needs more work to it.
 I might have to over dye it with something. Maybe black or grey, but at the moment here is my first Arashi Shibori!
Enjoy
Nat
Autumn is well and truly here in Australia. With all the Autumn leaves beginning to fall I thought of experimenting with some leaves from trees in my neighborhood. This is the first Autumn since I started experimenting with natural dye. I don’t usually put any fabric in the dye pot until I see the colour the leaves produce. Today I’m dyeing with Pin Oak leaves (Quercus palustris). The leaves were nice and red, but they felt crisp and dried so I thought they wouldn’t give out much colour. To my surprise after 25-30 minutes of boiling a deep orange colour started to appear. I quickly stitched up a piece of Komasu Shibori and dropped it in the dye pot.
 This is what I got after 30 minutes. I left it in the dye pot for a further 24 hours. After removing the stitchings the colour and texture looked good enough to eat! I was so eager to see the result that I forgot to take a photo before I untied the stitches. You can see how beautiful it looks!

I drew the square template right next to each other leaving less than an inch between them. I folded the fabric into quarters and only had two rows of stitching along the length of the cloth.
I haven’t try Arashi Shibori yet because I don’t like the idea of steaming the reactive dye in my kitchen! I will have to find way of steaming it outside!
Enjoy
Nat
My class mate Deanna was dyeing Shibori using natural dye with onion skin. It turned out very well. I love natural dyeing so at the weekend we went for a picnic and I found some Liquid Amber leaves on the ground and thought I would try dyeing with them. A few weeks ago I would throw in a piece of silk into the dye, but since I started this Shibori class I couldn’t help putting some Shibori stitches on the pieces. I was pleased how they turned out. The colour is not yellow or brown, but it has both yellow and brown mixed.
Very beautiful!
I think I have mastered the Komasu Shibori technique. I’ve got an ok from Glennis to make this simple tutorial to share with you. The Komasu Shibori looks beautiful after it is dyed. To my surprise it’s the simplest method to make.

I have been using silk kimono lining that I’m using for all my other projects. Sorry I don’t know what kind of silk it is. I cut an 8″ x 14 1/2″ piece, fold it in half, lengthwise. Now you have a 4″ x 14 1/2″ piece. You need a square template 3″ x 3″ I cut my template out of soft plastic from an old DVD case. You can use anything for it. Mark a line across from corner to corner with a permanent marker.
I like working on my quilting cutting mat. Place the diagonal line on your template on the fold a little bit away from the edge of the silk. Line up the template point to a line on the mat. Draw lightly the half square triangle with pencil. Do the same on the raw edges of the silk leaving a 3″ space from the last point to the next point (you can leave more space if you wish). Make more patterns until you get to the other end of the silk.
The drawn lines are now on the silk (see left photo). Starting from right to left stitch with running stitch along the line. Make sure to tie a large knot at the end of your thread. When you finish, cut the thread leaving an 8″ tail. Complete the other motives until finished.
When completing all the stitching, drawn up the thread tightly (see above left photo). Using the same thread start binding from the base outward toward the point. The bigger the bit you leave unwraped at the points, the larger the area the dye can penetrate onto the cloth (see the above right photo).
 The binding is now completed and you are ready to dye it. I used only one color for the cloth, but you can use more than one color if you wish. The cloth on the right was the original piece that I dyed using the same technique.
I hope my instructions are easy for you to follow. Leave me a comment if you are unclear about anything. Hope to see some of your pieces here soon.
This is my second try on Komasu Shibori. I was very happy how it turned out the first time so I wanted to try it again in a different colour. I used the whole width of kimono silk which is 14.5″ wide and 2 meters long. I divided the piece into 4 sections and stitched on the folds. The tube looked like a caterpillar with sharp spikes before I dyed it.
 I made it as a scarf for my trip to Japan with Glennis’ Silk Study Tour. Something to show and tell on the tour. I’m so happy how it turned out, but I will leave it longer next time I dye using this technique (I use Procion dyes for all my pieces). I was worried that the dye would be absorbed in all the areas. As Glennis said, it’s a life long experiment and I love it.
Happy Dyeing
Nat
During the week I spent sometime preparing shibori stitching ready for the new lesson with Glennis on stitch shibori. I wasn’t disappointed that Glennis posted the lesson up on Wednesday. Today I’m ready to dye! The dyes have already been mixed and stored in the refrigerator ready to be used. I was a bit anxious before I dipped the pieces in the dye. There was a lot of stitching going into each piece and if it didn’t turn out right then it would be wasted.

Apart from the online workshop with Glennis I also got myself a book Shibori by Yoshiko Iwamoto Wada. With both the book and the workshop I was ready to start. I’ve chosen two basic patterns to begin with.
 Here are the results of what I dyed this morning. The one on the left is call Karamatsu shibori dyed in indigo using Procion dye. Ideally I should have left both in the dye a bit longer, but I couldn’t wait to see the result. I only left it for 5-6 hours instead of overnight. On the right is Komasu shibori using marigold and brown. Both pieces measure 40″ x 7.5″. My next piece is going to be big enough for a scarf. I feel that it will be hard for me to cut into them for anything!
Please leave me a comment if you like what you see here!
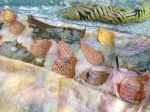
On Sunday Jacky and I got together to dye our first batch. I’m using Procion dye which I have a lot to share with Jacky. Procion dye takes longer to react to fabric. We tried many techniques from Glennis’s lesson. We are lucky to have various shapes we have been collecting. I recently renovated our home and there were leftover mosaic pieces from the bathroom and kitchen. We also cut up some CD-Roms.

All pieces are from silk kimono lining. Some of them were rejected pieces that I natural dyed previously. I actually like them better with the imprints of leaves or flowers. I added the really fragile pieces (top right corner) into the dye bath to soak up the leftover dye.
I’m happy with the result of the first batch and looking forward to do some stitching Shibori soon.
Enjoy
Nat
This is my test post for the shibori technique workshop with Glennis Dolce. I’m new to WordPress, still finding my way. It’s really fun I like it so far.
Hi all, it’s good to be here. i haven’t started dyeing yet. i will be using procion dye which i already have a lot of. it takes longer for the dye to react with the fabric. i will see how it goes.
in the image was a batch of rainbow coloured fabric i did last year. like glennis said in her video this was from the leftover.
 it looks like fun so far. i will get my hand in the dye this weekend!
Please leave me a comment if you are reading this
thanks
Nat
my first try at shibori. it was okay i enjoyed it!
 i’m taking an online workshop with the master at shibori girl
hopefully by the end of the workshop i will learn a thing or two of the art of shibori.
this is my first post with wordpress.com
| Renny Marina on Komasu Shibori | |
| Fatima on Komasu Shibori Tutorial | |
| raori on Komasu Shibori Tutorial | |
| Sandra on Komasu Shibori Tutorial | |
| fatima talha on Komasu Shibori Tutorial |


